Monday, June 30, 2025

Caprese Salad


This is my most favorite summer salad.  I've posted a variety of these salads through the years, but each one I make is slightly different and I always want to share them with all of you.

You can make a small serving or slice as many tomatoes as you like and have a huge platter for serving a crowd.


Use the ripest tomatoes you can find, along with a fresh and firm mozzarella.  You can purchase large rounds of mozzarella that are already sliced which makes assembling these salads a breeze!

One of the main reasons I plant numerous basil plants each summer is to have plenty of these gorgeous leaves to nestle in-between the tomato and cheese slices.


I sliced two large tomatoes and used the same amount of mozzarella slices.  

As you can see, I alternated the tomato slices and cheese slices.  After I got everything plated, I ground sea salt and black pepper evenly over the top.  Then it was time to place those fresh basil leaves over, under, and around the salad.

To quote Ina, I then drizzled on some "really good" olive oil and then topped with a purchased balsamic glaze.

A beautiful presentation for family and friends, plus a fresh and healthy salad, is perfection for hot summer days.


Around Lolly's Sideboard: Summertime China


I came across this absolutely gorgeous set of china at an estate sale recently.  The online pictures of the sale did not do justice to the delicate beauty of the pattern.  

I'm going to post close up shots of the pattern and let some of you online sleuths come up with the definitive answer to What Is The Pattern?  It seems like every search I conduct gives me a different answer!

We'll start with the mark on the back of the pieces.


Apparently, this company made dozens of patterns that are extremely similar.  So, if you can figure out the correct pattern, I'd be eternally grateful.

This set was a 12 piece place setting.  I'm a sucker for a floral pattern on china and I think this will be perfect for next Easter's meal.

Dinner plate and salad plate:


Cup and saucer:


Berry bowl and dessert plate:


Soup bowls:


Bread and butter plate:


Creamer and sugar:


Gravy boat:


Large platter and covered vegetable bowl:


Small platter:


Vegetable bowl:


At some point in my life, I may finally be able to use fine china on a daily basis!  Why should we pack away the most beautiful dinnerware and only use it on special occasions?


Wednesday, June 25, 2025

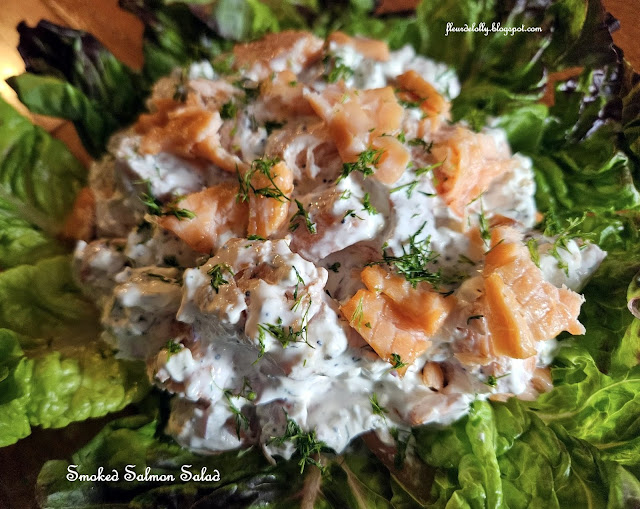
Smoked Salmon Salad


We're seriously enjoying that smoked salmon I purchased at Sam's Club.  If you like smoked salmon and the ingredients that are usually loaded onto a bagel, here it is in salad form!


You'll need:

8 - 10 oz. smoked salmon, cut into 1/2" cubes
4 oz. cream cheese, softened
1/2 cup sour cream
1/8 cup diced red onion
1 T. capers, chopped
1 - 2 t. Everything Bagel seasoning
zest of half lemon
juice of half lemon
fresh dill

In a medium bowl, combine the cream cheese and sour cream until smooth and creamy.

Gently stir in red onion, capers, seasoning, zest, and juice of half lemon.  

If you like fresh dill, finely chop as much (or little) as you'd like and mix that in to the cream cheese/sour cream mixture.

VERY GENTLY fold in the smoked salmon pieces until well combined.  If you'd like, you can reserve a bit to place on top before serving.

Refrigerate for at least 30 minutes, but a couple of hours is better to allow the flavors to meld.  


I lined a serving plate with red leaf lettuce leaves and piled on the salad for serving.  As you can see, I added pieces of the reserved smoked salmon on top with additional chopped dill.

With this salad, you can make lettuce wraps, serve on top of shredded lettuce, or roll up in a tortilla!


Buffalo Chicken Wraps


I posted this on my Facebook page last night and today decided it was delicious enough to warrant a blog post!

Here's what I did to make these yummy wraps.  This is more of a step by step direction rather than a list of ingredients and the process.  Make sure you read it all the way through!

I diced 1 lb. b/s chicken breasts. 

Make sure to salt and pepper the chicken and place in a skillet with 1 T. olive oil over medium heat. 

After the chicken browns, remove it to a bowl and set aside.

Add 2 T. butter and 2 T. Frank's hot sauce and lower the heat and whisk to combine. Let it cook for a minute or so and then add the chicken back to the skillet.  Stir to make sure all the chicken is thoroughly coated with the sauce.

Let everything get happy in the skillet. Remove from heat. You can add the chicken on top of a salad, roll up in a tortilla or place in a lettuce leaf. 

Don't forget to top with blue cheese or ranch dressing!


Monday, June 23, 2025

Dining Out Southeast: 19 Degrees North Seafood and Grill, Dahlonega, GA


Yesterday we spent a few hours in Historic Dahlonega, Georgia.  There's so much history here beginning with the discovery of gold in 1928.  Mountains, hiking trails, waterfalls, wineries, shopping, antiques, pottery, and restaurants make this a destination for many.  

We selected 19 Degrees North Seafood and Grill for our lunch spot.  There are several options for seating including upstairs, on the porch, and in the lovely dining room.


Although the dining room was sparsely filled when we were seated, we realized that there were many diners upstairs.  

Here's the menu.


We're doing our best to stick with the low carb plan and we had delicious options here.

I ordered the Blue Cheese Wedge Salad and added grilled shrimp.

This was a LARGE salad with homemade blue cheese dressing which was thick and creamy and full of blue cheese crumbles.  


Ingredients of their version included crisp Iceberg lettuce, bacon, green onions, diced tomatoes, and an ample serving of blue cheese crumbles.  If you're a blue cheese lover, you need to order this salad.

There were 8 large grilled shrimp which were perfectly cooked and well seasoned.  Thumbs up from me!

Sweet Harold selected the seared haddock with green beans, and coleslaw.  


To say he was happy with his meal would be an understatement.  The haddock was expertly prepared and nicely seasoned.  He declared both the green beans and coleslaw as "Delicious!" and enjoyed both the tartar sauce and cocktail sauce.  He was strong and only nibbled one of the hush puppies, but enjoyed that one bite!

Service was attentive and we enjoyed the atmosphere inside the dining area.  

If you visit Dahlonega, stop in and enjoy a great meal.

Friday, June 20, 2025

Crock Pot Pork Roast


Today was going to be a busy day, so I decided to cook a pork roast in the crockpot.

I seasoned it all over with Hardin's Seasoning, a little sea salt, and freshly ground black pepper.


Normally, I sear a roast for the crock pot in a skillet on the stove, but I didn't want to mess with that today, so I fired up the grill.


After I got a good sear on all sides, into the crockpot it went!

I added two cups of vegetable stock, a ton of minced garlic, a yellow onion, thinly sliced, and two bay leaves.


I covered the crock pot, set it to high, and let it cook 4 hours.  Then I reduced the heat to low and let it cook another hour.

And here we are!


If you want your pork roast to be sliceable, start checking the texture after about 3 hours on high.  I like it to be where I can shred it because I like to make soft tacos with the leftovers! 

Sunday, June 15, 2025

Keto Green Beans with Parmesan


Y'all know how I love to roast vegetables in the oven with the simplest ingredients.  This dish will become another family and friend favorite.

1 lb. fresh green beans
olive oil
garlic powder
onion powder
sea salt
freshly ground black pepper
1/2 - 3/4 cup freshly grated Parmesan cheese

Preheat oven to 400 degrees F.  

On a large rimmed baking sheet, spread the green beans in an even layer.  Drizzle with olive oil.  Season the beans with the garlic and onion powder, sea salt, and freshly ground black pepper.  Using tongs, toss the green beans to coat with the olive oil and seasonings.

Roast the green beans in the oven for 15 minutes.

Using tongs, toss the beans again and sprinkle with the Parmesan cheese and roast for an additional 15 minutes.

When removing from the oven, you can serve immediately, or sprinkle with MORE Parmesan before serving.

Place in a pretty serving bowl or tray.

Did I mention these were Keto?  😁


Cauliflower Au Gratin


When I'm going through my low carb phase(s), I struggle sometimes with my side dishes.  I always want the potatoes!  Always.  

I found a recipe online for cauliflower au gratin and did some work on the ingredients AND the process of putting the ingredients together to make it mine.  

This dish almost fooled my brain into thinking I was looking at macaroni and cheese or hashbrown casserole.  The flavor was complex and satisfied my need for carbs in a low carb side dish.

If you're looking for a way to enjoy a comfort food side dish without the worry of carbs, give this one a try.

This serves six easily.  If you want to reduce the amount of servings, feel free to half the ingredients.

2 lbs. cauliflower
6 oz. bacon, diced
2 small leeks, dark green removed, halved lengthwise, washed carefully to remove any grit or dirt, then thinly sliced
2 cloves garlic, minced
8 oz. block of mild cheddar cheese, shredded, divided
8 oz. cream cheese
3/4 cup heavy whipping cream
salt and pepper to taste
chopped fresh parsley for garnish

Preheat oven to 400 degrees F.

Spray a 9 x 13 baking dish with olive oil spray.

Break the cauliflower into florets, removing hard stems, and wash thoroughly.  Bring a large pot of water to a boil and lightly salt the water.  Boil the florets for 5 - 6 minutes, drain, and set aside.

In a large skillet, fry the bacon until crispy.  Remove the bacon from the pan to a paper towel lined plate.  Set aside.

Add the leeks to the bacon drippings, lower the heat to medium low, and cook until leeks have softened.  Stir occasionally during the 4 - 5 minutes for the leeks to cook.  Add in the garlic and cook for 1 - 2 minutes.  

Set the heat to low.  Add the bacon back to the skillet and stir in the cream cheese and all but 1/4 cup of the cheddar cheese.  When cheese has melted, add the heavy cream and stir to combine.  Taste and season with salt and pepper.  

Carefully add in the cauliflower and stir to thoroughly coat the florets.  

Pour into the greased baking dish and top with the remaining cheddar cheese.  Bake for 25 - 28 minutes until the gratin is browned and bubbling.  

Remove from oven and top with chopped fresh parsley.


Thursday, June 12, 2025

Chicken Teriyaki Stir Fry


It's time to get back on the low(er) carb way of eating for a bit!  This meal was not only gorgeous on the plate, but delicious and healthy as well.

Start to finish, the time to prepare this meal was 20 minutes!  You can't order take out and get it delivered in that amount of time.

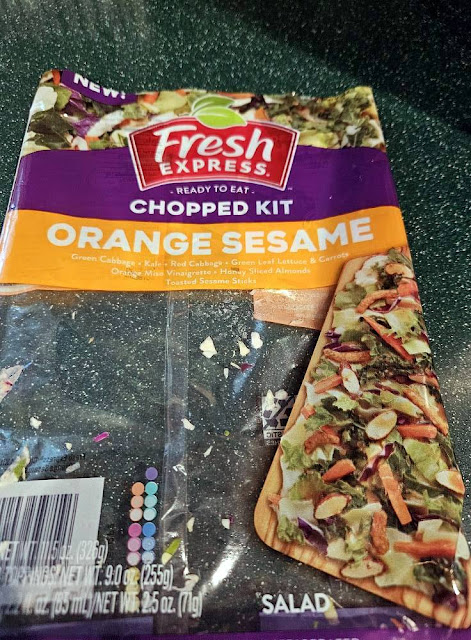
For the salad, I purchased an Orange Sesame Chop Salad Kit.  If you haven't tried any of these kits, there are many variations and are filled with a mixture of greens, vegetables, and have a small pouch of complementary dressing and toppings.  The orange flavor was outstanding and the toppings included sliced almonds and crunchy sesame sticks.  This was the perfect side dish for the Chicken Teriyaki Stir Fry!


Here's a picture of the bag if you want a reference when you go grocery shopping!


Now let's make the stir fry.

1 lb. boneless/skinless chicken breasts, cut into 1/2" cubes
1 T. olive oil
1 t. Kinder's Japanese BBQ seasoning, divided
1 yellow onion, thinly sliced
1 green bell pepper, seeded, thinly sliced
6 - 8 large white button mushrooms, thinly sliced
1 T. minced garlic
2 T. Kinder's Teriyaki Sauce and Glaze
1/2 t. sesame oil
white and black sesame seeds for garnish

I cubed the chicken, drizzled with the olive oil, and sprinkled on 1/2 t. of the Kinder's seasoning.  I stirred to give it all a thorough coating.


You'll need a wok or a large skillet.  Place the wok over high heat and get it very hot.  Add the chicken all at once and cook, stirring constantly, until the chicken has browned.


Remove to a bowl and set aside.

Add the onions, mushrooms, and peppers to the work and sprinkle on the remaining seasoning.


The veggies will need to be cooked down for a few minutes, stirring constantly.  After 3 - 4 minutes, add in the garlic.


After a minute or so of constant stirring, add the chicken and any juices that are in the bowl back into the wok with the vegetables.


Next, lower the heat to low and stir in the Teriyaki Sauce.  Cook for another minute and remove from heat.

Drizzle with the sesame oil and sprinkle with the sesame seeds.  Serve immediately.


Served with the orange sesame salad, this was a meal that made Sweet Harold very happy.