Monday, December 21, 2015

French Onion Soup


One of my most favorite Christmas traditions is preparing a big pot of French Onion Soup. There are few aromas in the kitchen which match the heavenly scent of onions and butter simmering away on the stove top.

It's customary to ladle up the soup into oven safe mugs or bowls, place the toasted bread and cheese on top and slide it under the broiler until the cheese is melted and browned. But that can't happen with my good china! So I went to plan B, toasted the sliced baguette, topped with lots of shredded Gruyere and then slide the pan back into the oven. THEN placed the bread and cheese goodness on top of the soup to serve!

5 lbs. yellow onions, peeled and thinly sliced
2 T. butter
1 T. olive oil
1 t. salt
few grinds of black pepper
1/2 t. sugar
3 cups sweet red wine
2 cans beef consomme
4 cups beef stock
2 T. Worcestershire sauce
1 T. dried thyme
2 bay leaves

Over low heat, place onions, butter, olive oil, salt, pepper, and sugar into a 5 - 7 quart Dutch oven. Stirring occasionally, let onions soften and begin to brown. The process of caramelizing the onions will take 30 - 45 minutes. Make sure the onions don't begin to stick and burn.

Add the wine, consomme, beef stock, and Worcestershire sauce and raise heat to allow soup to come to a gentle boil.

Reduce heat to a simmer, add the thyme and bay leaves and cover. Let soup simmer for several hours.

If you want to let soup cool and refrigerate overnight, it will taste better the next day. Skim off any fat that forms on top of the soup.

Gently reheat and ladle into bowls. Place a piece of toasted bread on top of soup and cover with grated Gruyere cheese. Place under oven broiler until cheese is melted, browned, and bubbly. Serve immediately.

Saturday Before Christmas Brunch - Appetizer Course


What better way to start the French themed brunch than with a selection of French cheeses, cheese puffs, fruit and nuts?

It's always nice to have different textures and flavors of cheese ranging from soft to hard cheeses such as Chevre (a goat cheese) which is very soft and spreadable. Next, a lovely Brie which was delicious with a drizzle of honey over the top. The blue cheese provided a great tangy flavor when paired with the sliced pears.  The ComtĂ© is a hard cheese and I sliced it into very thin pieces almost like matchsticks.

Tucking a few small bunches of grapes around the cheeses and the pears makes for a lovely presentation.  

For the pecans, I added a tablespoon or so of butter into a small skillet over low heat.  When it was melted, I added about 2 cups of pecans and a little salt and stirred continuously until the pecans were coated with the salted butter and were lightly toasted, about 4 - 5 minutes.

The cheese puffs, also called gourges, are simple to make and trust me, I don't care how many you prepare, it won't be enough!  There will be a separate blog post for the recipe for those.


Sunday, December 20, 2015

Chambord Kir Royale


When I began planning the French themed brunch, I knew I wanted a beautiful deep red color in those glasses!

Place your champagne flutes in the freezer for about 10 - 15 minutes before preparing drinks.

When ready to serve, add 1 - 2 T. Chambord to each flute.  Fill each flute with champagne and add a few raspberries if desired.  

Serve immediately.

The Saturday Before Christmas Brunch 2015


Last year I hosted the first ever Saturday before Christmas Brunch. God willing, this will continue to be a great tradition.  I chose a French themed meal for the brunch and everything thankfully paired well together and the brunch courses flowed smoothly. We began the fun a little after 10 a.m. and finished up a little after 2 p.m.!  I hope you enjoy the pictures and each menu item will have its own blog post with the recipe.


Thursday, December 10, 2015

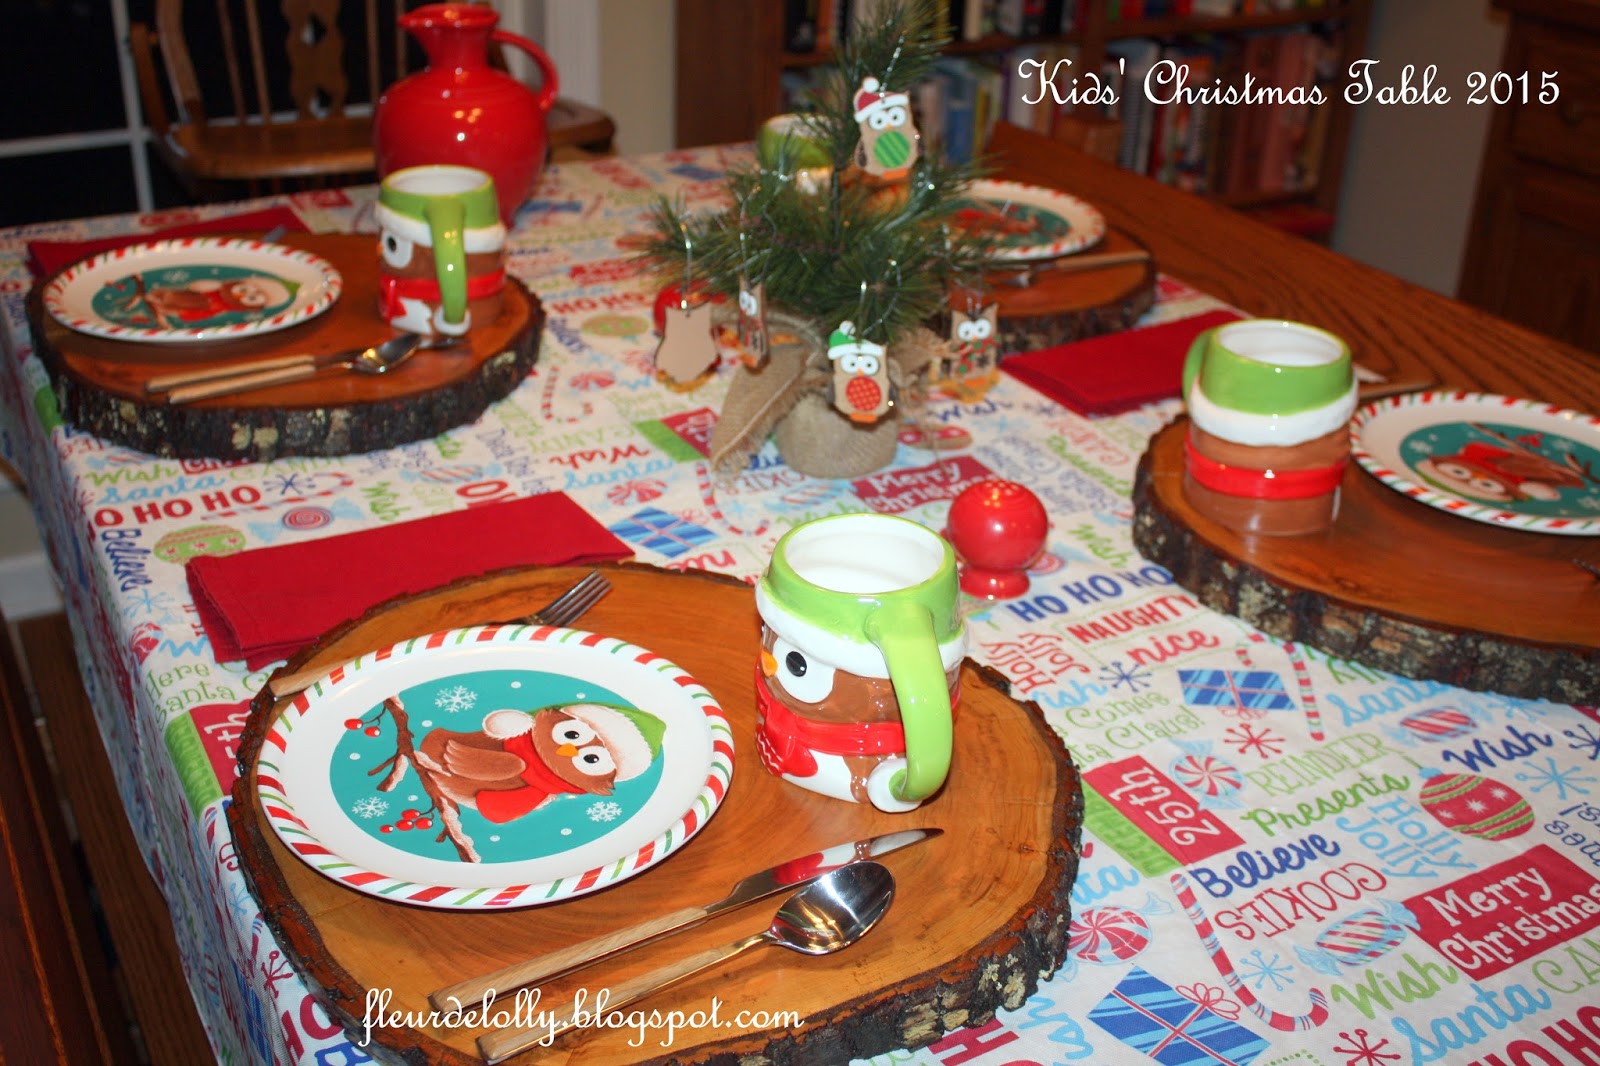
Kids' Christmas Table 2015

This year the youngest granddaughter has become quite interested in owls. I knew I wanted to incorporate them somehow into the Christmas decorating. I found the plates and mugs at Wal-Mart for about 2 bucks each and the hand crafted wood chargers made the perfect landing spot for them. A simple little Christmas tree with a few owl ornaments make a fun centerpiece. The silverware is from World Market.


Friday, December 4, 2015

Winter Forest Table Setting

Sweet Harold took a trip to Gander Mountain this morning to purchase a set of flatware that he spied in last week's sales paper. The flatware incorporates pine cones into the pattern. There were a wonderful buy with the sale that's going on for the next few days. And because he knows me well, he surprised me with new dinnerware to go along with the flatware! Before he could get the boxes open, I was already planning the table setting. I knew I wanted to use only browns, greens and off-whites. I think it really turned out well.  


Tuesday, December 1, 2015

The Celery Experiment

Thanksgiving afternoon when I began the chopping of veggies for the cornbread dressing. I remembered seeing an article on line about saving the base of a stalk of celery and placing it in water to sprout.

I thought I would give it a try. I sliced through the entire stalk and placed the base in a bowl about an inch larger than the celery. Then I added water about an inch up the stalk. I've been changing the water in the bowl every day. Today, I noticed it's beginning to sprout. Here's the result so far!


I'll post some more pictures to show the rate of growth. 

Here we are a week later. 


Sunday, November 29, 2015

Caramel Apple Sparklers


We have been enjoying these delicious adult beverages for the last few weeks of Fall. I can guarantee that they are too yummy not to be enjoyed any time of the year. If you like caramel apples, you'll fall in love with this bubbly version.

1 ounce caramel vodka
3 ounces apple cider
2 ounces sparkling wine / prosecco / champagne
Honey and coarse sugar for garnish

Dip the rim of a champagne flute into honey and then into coarse sugar to create a sparkling rim for your cocktail.

Then, to the glass, add the caramel vodka and apple cider. Top with sparkling wine.

Thanks to www.berries.com for the recipe!

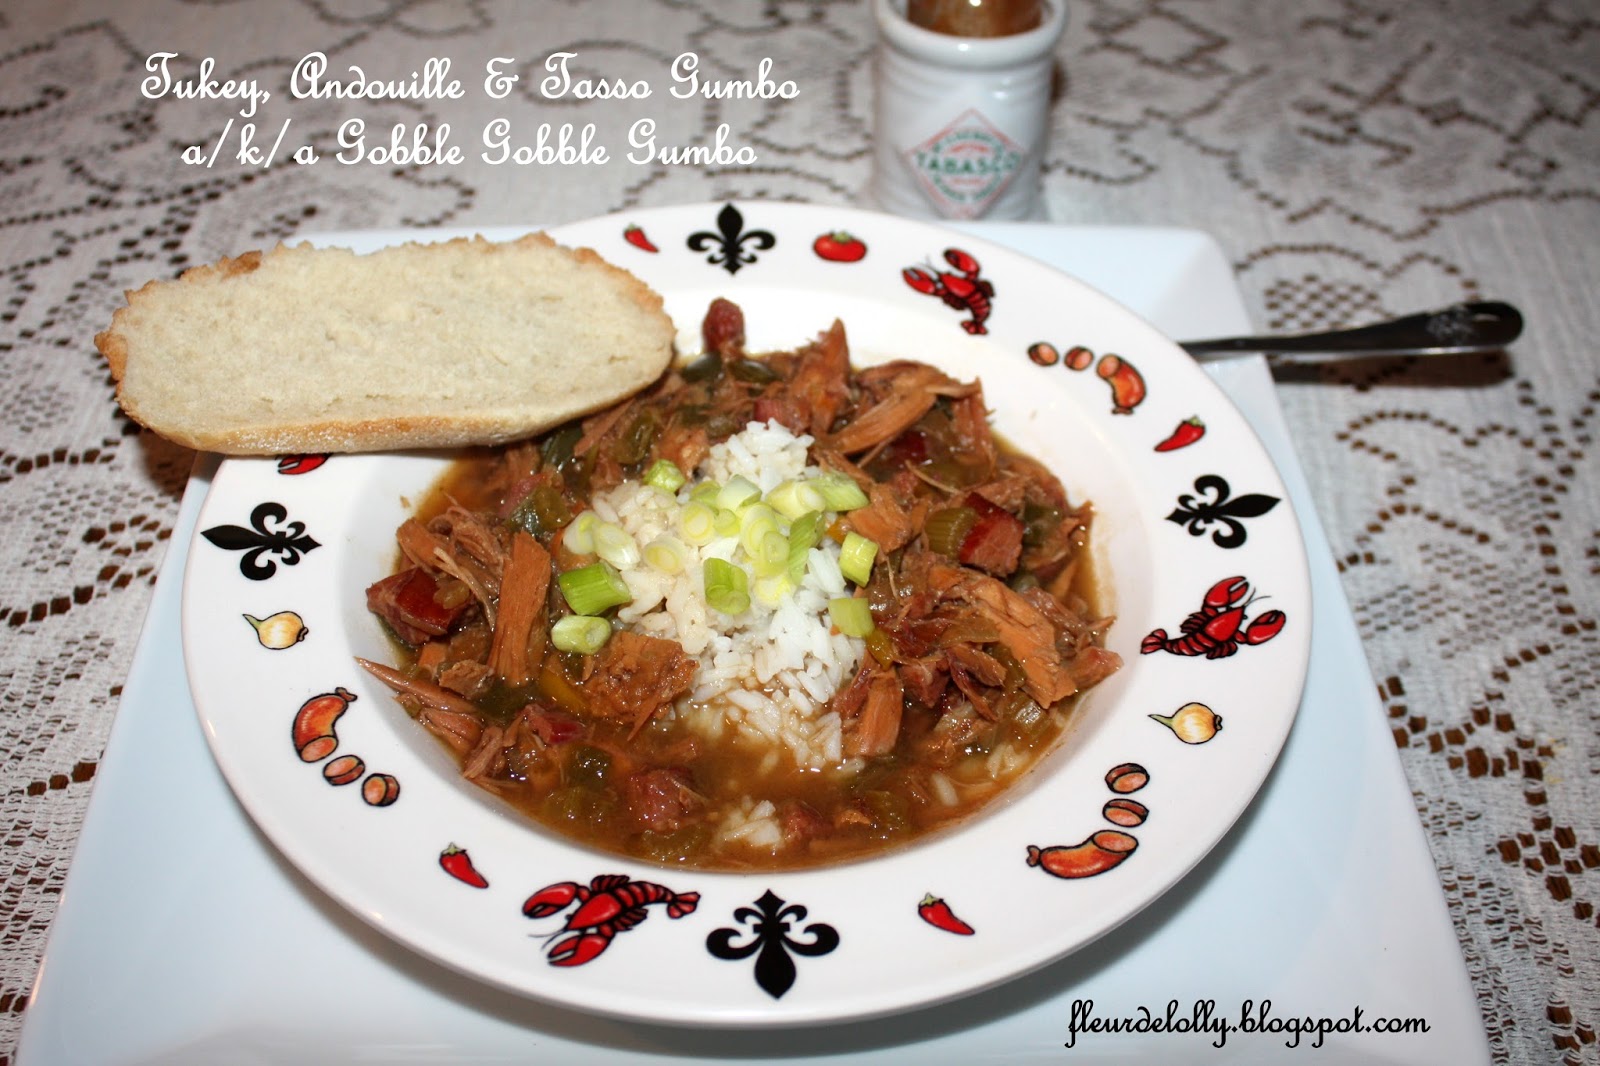
Turkey, Andouille & Tasso Gumbo a/k/a Gobble Gobble Gumbo


This is my favorite tradition of the Thanksgiving season. I always make turkey gumbo in some form the day after Thanksgiving for us to enjoy during the weekend. This year I put the turkey carcass along with some vegetable scraps, lots of water, some peppercorns, and a bay leaf in the crock pot overnight.  I had about 3 quarts of gorgeous turkey stock ready the next morning.

I enjoy the chopping of the vegetables, the stirring to make the roux, the delicious aroma as the gumbo simmers all afternoon.  Served over hot rice, this is a great alternative to all those leftover turkey sandwiches.


6 T. butter
6 T. all purpose flour
2 large yellow onions, chopped
2 large green bell peppers, chopped
4 ribs celery, diced
3 cloves garlic, minced
3 quarts turkey or chicken stock, simmering in a large Dutch oven
2 quarts water
8 oz. tasso, chopped
8 oz. andouille, chopped
2 cups cooked, shredded turkey
2 T. Creole seasoning
1/4 - 1/2 t. cayenne pepper
sliced green onions
hot sauce (optional)
hot cooked rice

In a large cast iron skillet, melt butter over medium heat. When it bubbles, add flour and begin to stir. The secret of a great roux is to get comfortable, pour yourself a nice drink and stir. And stir. And stir. If you scorch the roux, throw it out and begin again. After about 20 minutes or so you'll have a dark chocolate colored roux.

Add vegetables and garlic at this point, all at once. Be careful because there may be some splattering. You don't want to get any of the roux on your skin. It will burn! Stir the vegetables into the roux and they will begin to soften. Let them cook for a few minutes and then slowing begin adding the stock to the vegetables a few ladles at a time.

Add the water and the tasso, andouille and turkey. Raise heat to bring the gumbo to a boil and add the Creole seasoning and cayenne pepper.

Lower heat to a simmer, partially cover and let cook for an hour or two.

Taste and adjust seasonings. You may need to add some salt at this point. Depending on what Creole seasoning brand you use, you may not need to add any additional salt.

Serve over hot rice and top with thinly sliced green onions. Hot sauce is optional. 


Saturday, November 28, 2015

Crock Pot Turkey Stock


Isn't that a gorgeous picture? Please don't throw away your turkey carcass when you're finished picking all the turkey off the bones for leftovers. If you want the easy way of making turkey stock, here you go. Let the crockpot do the work for you. Place the turkey carcass, any onion peelings or celery scraps you have left from making your dressing or stuffing, a bay leaf, a teaspoon or so of pepper corns and enough water to reach almost to the top of the stock ingredients in a crock pot and set to low.  Cover and let the crock pot do the work.

Here's mine right before I put the lid on the pot.


My batch simmered on low for about 12 hours. Here is is the next morning.


Remove the large pieces with tongs and let stock cool. Strain through a cheesecloth or a fine mesh sieve. Now you're ready to make gumbo, turkey soup or freeze for use later.

Sunday, November 22, 2015

Rosemary and Cranberry Spread


My daughter found this recipe and asked me to make it for a family gathering this weekend. I'm very glad she found this one. Very simple and easy to make and would be wonderful to keep on hand during the holiday season for drop in guests.  

8 oz. cream cheese, softened
1/2 t. garlic powder
4 T. dried sweetened cranberries, chopped
2 t. chopped fresh rosemary
fresh cracked pepper and kosher salt

Place cream cheese into a bowl and using a spoon, fold in all ingredients until well combined.  Serve alongside crackers or toasted baguette slices.

Thanks to Life's Ambrosia

Tuesday, November 17, 2015

AARP - Life Reimagined - $10,000 Sweepstakes (Ages 21+)

Introducing the Life Reimagined® LifeMap. A program designed to help you rediscover what matters most. It all begins with finding your sense of purpose. Create a simple plan that will help you unlock your full potential and you could win $10,000 to make your dreams a reality. It's time to live the life you've always wanted.


Sunday, November 15, 2015

German Chocolate Macaroons


I will preface this blog post by stating that I am not a huge fan of coconut. However, once I tried these delicious macaroons, I will say I am a fan of THESE!

This recipe made about 4 dozen macaroons. They are very easy to make and drizzling on the chocolate and caramel topping was FUN!

5 1/3 cups shredded sweetened coconut
3/4 cup sugar
6 T. flour
1/2 t. salt
5 egg whites
1 cup finely chopped toasted pecans

Chocolate topping:
4 ounces semi-sweet chocolate
1 T. shortening

Sweetened Condensed milk topping:
6 ounces sweetened condensed milk

Place sweetened condensed milk in a double boiler until slightly thickened (about 45 minutes). Keep warm.

Preheat oven to 350 degrees. 

Line cookie sheets with parchment paper or lightly grease and flour the cookie sheets.

In a large mixing bowl, combine coconut, sugar, flour, and salt. Toss and mix well. Lightly beat egg whites and mix in the egg whites and nuts.
 
Using a round tablespoon, drop macaroons onto prepared cookie sheets.

Bake for 20 - 23 minutes or until golden brown on top. Place on cooling rack.

Melt chocolate with shortening in microwave in 30 second increments, stirring in between each increment until chocolate is melted. Drizzle chocolate over macaroons.

Then drizzle thickened sweetened condensed milk over the chocolate.


From Chef in Training.

Nine Layer Salad


I love this type of salad. You can mix and match the veggies you like, but one thing is certain it MUST contain petite green peas. Well, I think it must.  Commonly called a Seven Layer Salad, I add a couple more layers and, trust me, this salad was none the worst for those additions. I'll give you my general outline of my layers and you can go from there. 

One tip I will pass along before we get started is regarding the chopped tomatoes. Before you start layering and assembling the layers, chop the tomatoes first. Place them a few at a time in a mesh strainer placed over a bowl. Sprinkle with salt as you peel and chop the remaining tomatoes. The salt helps to pull the juice out of the tomatoes. You'll be surprised how much juice will be in the bowl when you're ready to use the tomatoes. If you don't take this step, all that juice will be in the bottom of your lovely serving bowl. That would not be good.

As you build your layers, you can fill in the middle with more of the romaine and spinach.

Layer 1:  3 - 4 cups of chopped romaine lettuce
Layer 2:  3 - 4 cups baby spinach
Layer 3:  2 green bell peppers, seeded and diced
Layer 4:  6 hard boiled eggs, peeled and chopped
Layer 5:  1 lb. bacon, cooked, drained and chopped
Layer 6:  4 - 5 tomatoes, chopped and drained well
Layer 7:  1 bunch green onions, thinly sliced
Layer 8:  8 oz. sharp cheddar cheese, grated
Layer 9:  10 oz. frozen green peas, partially thawed

Dressing: 3/4 cup mayonnaise, 3/4 cup sour cream, 1 t. white wine vinegar, 1 T. sugar

Use a trifle bowl, or a clear glass bowl with straight sides so all your beautiful layers will show to their best advantage. 

Begin to layer in the order as listed above. Sprinkle the romaine and spinach with salt and pepper. Instead of spreading all your ingredients all the way across the greens, concentrate on placing them against the side of the bowl. 

Fill in the middle with the greens as you go. End with a layer of peas that WILL go all the way across the top of the layers.

Whisk together all the dressing ingredients. Pour over the top of the salad, carefully spreading to the edges of the bowl.

A few grinds of black pepper add the perfect finishing touch.

Cover and refrigerate for up to 6 - 8 hours. Toss just before serving or let your guests spoon down through the layers.


Outdoor Autumn Brunch Table Setting


I thought you might enjoy a few pictures of our brunch table from this morning. A few weeks ago, a friend shared a picture of a lovely table setting on a deck with gorgeous Fall leaves in the background. Unfortunately, most of our leaves have fallen, but I can always trust Fiestaware to help showcase Fall beauty in dinnerware (brunchware?) form.


The tablecloth and napkins are from Kohl's. Silverware from World Market. Those amazing hand crafted wooden chargers? Sorry, those are one of a kind, never to be made again, chargers that I received for my birthday this year.  


And now to showcase the Fiestaware! Dinner plates are Sage, salad plates are Ivory, and the small bowls are Paprika. The water glasses are Fiestaware, too!


Cranberry, Pecan and White Cheddar Cheese Ball


If you're tied of the same old cheese ball, here is a delicious new version. The tartness of the dried cranberries pairs wonderfully with the sharpness of the white cheddar. Please, please, please shred your own cheese. The few minutes it takes to shred a small block of cheddar will make all the difference in the texture of these cheese ball. Pre-shredded cheese is coated with cellulose so that doesn't stick together in the bag. 

1/2 cup chopped pecans
1 - 8 oz. package cream cheese, softened
8 oz. good quality sharp white cheddar cheese, shredded
1/4 t. salt
1 t. Worcestershire sauce
1 1/2 cups dried cranberries.
crackers for serving

Place pecans in a small skillet over very low heat. Toast pecans for 5 minutes or so, stirring often. Remove from heat and set aside.

In a large mixing bowl, using a hand mixer, beat together the cream cheese and the cheddar cheese. Add in the pecans, salt, and the Worcestershire sauce. Continue mixing for another minute or two until everything is well combined. Remove the mixture from the bowl and form into a ball with your hands.

Using small handfuls at a time, place dried cranberries all over the cheese ball, pushing in lightly to secure them into place. Try to cover as much as possible except the bottom of the cheese ball. 

Wrap in plastic wrap and place in refrigerator for at least 30 minutes.

Serve with assorted crackers.


Adapted from Eat, Drink, Love

Wednesday, November 11, 2015

Italian Sausage & Penne Pasta One Pot Dinner


Last Saturday was a classic November day. Drizzling rain, dark gray skies and the atmosphere that makes you crave comfort food. This recipe will make you feel warm, comforted and satisfied. Now that's not putting much pressure on these simple ingredients is it? A huge added bonus is that it is cooked in one pot. One pot. Here's our cast of characters.


1 lb. mild (or hot) Italian sausage
1 medium yellow onion, diced
1 green bell pepper, diced
3 cloves garlic, minced
1 T. dried Italian seasoning
1 t. dried oregano
1/2 t. dried red pepper flakes
salt and freshly ground black pepper
28 oz. can crushed tomatoes
1 14.5 oz. diced tomatoes with basil, garlic, and oregano 
6 oz. water
2 cups dried mini penne pasta
14 oz. ricotta cheese
chopped parsley and freshly grated Parmesan for garnishing

In a 4 quart Dutch oven, add Italian sausage and break it up with a wooden spoon. Set heat to medium and let sausage begin to brown. 

Add onion, pepper, and garlic and stirring occasionally, let mixture cook until sausage is cooked and vegetables have softened, about 7 - 8  minutes.

Add Italian seasoning, oregano, red pepper flakes, salt (about 1 t.) and several grinds of black pepper. Drain fat from pot if needed.

Add tomatoes and water and stir to combine. Raise heat until you have a gentle boil. Add pasta and lower heat to a simmer. Stir to make sure pasta is mixed in to the liquid so it is completely covered.

Let pasta cook for 8 - 10 minutes until it has reached the al dente stage.

Add ricotta cheese a spoonful at a time until all the cheese is in the pot. Turn off heat and allow the ricotta to melt into the sauce.

Remove from heat and garnish with chopped parsley and grated Parmesan.

Serve with garlic bread. 

Oh yes....you'll only have ONE pot to wash!

It's FREE Fall Sample time!

Sign up to QualityHealth and complete your health survey to receive your FREE Fall Samples!